TechVantage Innovations

MotionTracker · Documentation

User Guide

A practical guide to getting started, selecting tracking points, reviewing your results, and exporting videos and animations.

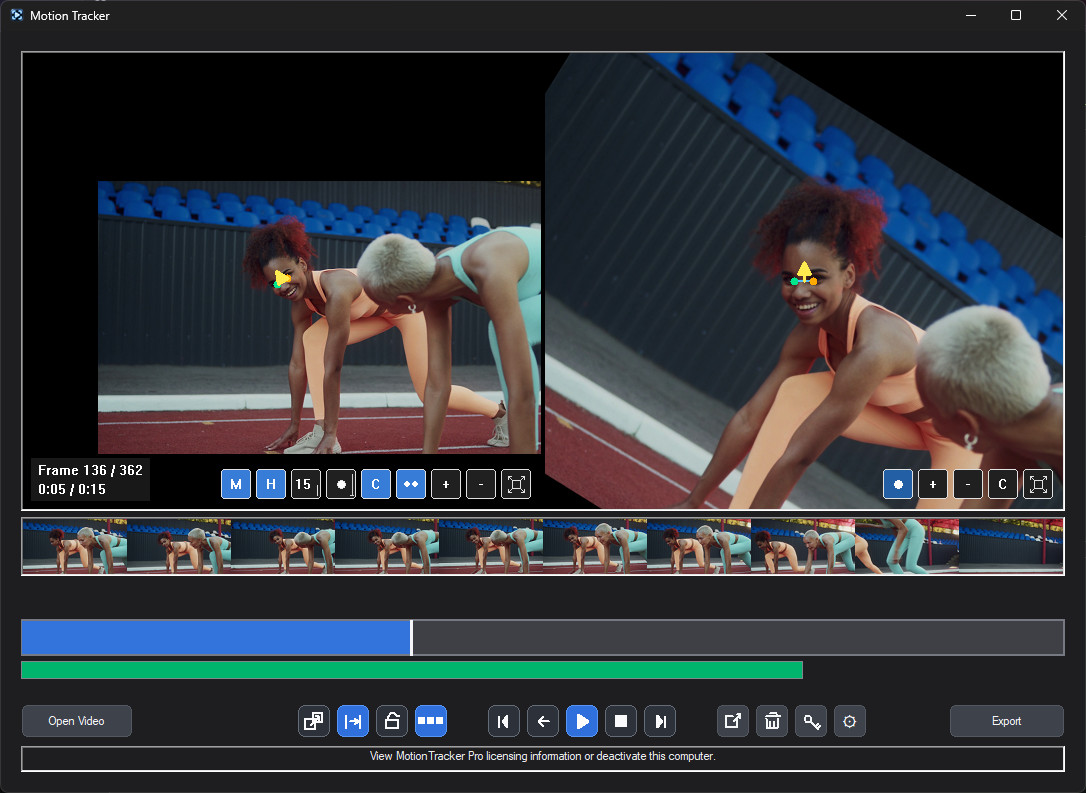
Actual MotionTracker main window showing source and output previews, preview controls, thumbnail strip, tracking timeline, and bottom toolbar
Actual MotionTracker main window — source preview on the left, processed output on the right, and timeline and controls below.
01

Getting started

Install and activate

Install MotionTracker on Windows, launch the application, and follow the license activation prompts if requested. Keep your license information accessible for future activation or device changes.

Open a video

Use the application’s video-open control to select a local video. Allow the initial video and thumbnail loading to finish before beginning tracking.

Understand the workspace

The left preview is used to select and adjust tracking points. The right preview shows the resulting centered or rotated output. The timeline is used to navigate footage and inspect tracking history.

02

Track a subject

One-point tracking

Choose one-point mode to follow a single visible feature. Select a high-contrast point on your subject in the left preview, then start tracking. Use this mode when you only need to follow position.

Two-point tracking

Choose two-point mode and select two distinct features of the same subject. The first point defines the primary tracking position; the second helps determine orientation. Swapping their order changes the orientation.

Centering and alignment

Enable centering to keep the selected tracking position in the output. Where available, choose First, Second, or Midpoint as the center reference. Use horizontal or vertical alignment options to control orientation.

Adjust a point

Pause playback, move to the desired frame, and set or revise tracking points in the left preview. Check the right preview before continuing.

03

Timeline and tracking history

Navigate footage

Click or scrub the main timeline to seek to a frame. Hover thumbnails and the caret thumbnail strip help locate scenes; thumbnail previews are separate from the full-quality tracking frames.

Review tracked ranges

Tracked segments appear as green bars. Use their controls to resume or remove tracking for a range. Review a few frames before and after edits to confirm the transition.

Tracked Frames Viewer

Open the Tracked Frames Viewer to inspect previously generated tracked frames. Depending on your settings, you may need to generate or regenerate frames after changing tracking history.

04

Preview and framing

Pan and zoom

Use the left preview’s zoom and pan controls to examine small features when selecting tracking points. Preview zoom does not automatically change the underlying source video resolution.

Check orientation

Use the output preview to verify the subject stays centered and the intended horizontal or vertical orientation is maintained. Pay particular attention to the beginning of a clip and to tracking transitions.

Transitions

If transitions are enabled, changes in center or orientation may be eased. Disable them when you want an immediate change; inspect the output before exporting.

05

Export your results

Video

Use the video export controls to choose an output location and available encoding settings. The source frame rate is generally the safest default. Changing the export frame rate can change playback timing and may disable audio preservation.

Images and tracked frames

Use the frame export options to save generated frames when needed. Check the output folder and available quality settings before starting a large export.

Animated GIF and WebP

Choose GIF or animated WebP when you need a looping animation. Configure frame rate, resolution or quality, and looping in the export options. Large dimensions and high frame rates can produce larger files.

Verify your output

After export, open the result in a video or image viewer and confirm timing, orientation, centering, and audio (if applicable).

06

Settings and workflow tips

Persistent settings

Some MotionTracker options are remembered between sessions. Check the tracking mode, centering, output format, and destination before processing a new project.

Long videos

Thumbnail generation and frame processing can take longer on lengthy or high-resolution recordings. Allow processing to complete, and test a short segment before a large export.

Save your originals

Keep an untouched copy of your source footage. Save exported results to a separate location so you can revisit or reprocess the original.

07

Troubleshooting

Tracking drifts

Choose a clearer, higher-contrast feature; avoid motion blur or objects that disappear behind other objects. Reposition the tracking points and resume from a reliable frame.

Output rotates unexpectedly

Review the order of your two points, the selected alignment, and the tracked history near the change. Confirm the intended orientation in the right preview.

Output does not match the preview

Check centering, transition settings, selected output range, and whether tracked frames need regeneration. Re-export a short test clip.

Video does not open or export

Confirm the file is accessible, the destination folder is writable, and enough disk space is available. Try a short clip to narrow down format-specific issues.

License or account issue

Use the account management area on the TechVantage website for subscription or license-related actions. If the issue persists, contact support through the website.

08

Settings — illustrated reference

These are screenshots of the actual MotionTracker settings window. Select the corresponding tab in MotionTracker to find the controls described below. Green switches in the screenshots are enabled; gray switches are disabled.

Tracking Settings

Control what happens when tracking points are selected, moved, lost, or replaced. The screenshot shows one saved configuration; values and switch positions are not necessarily factory defaults.
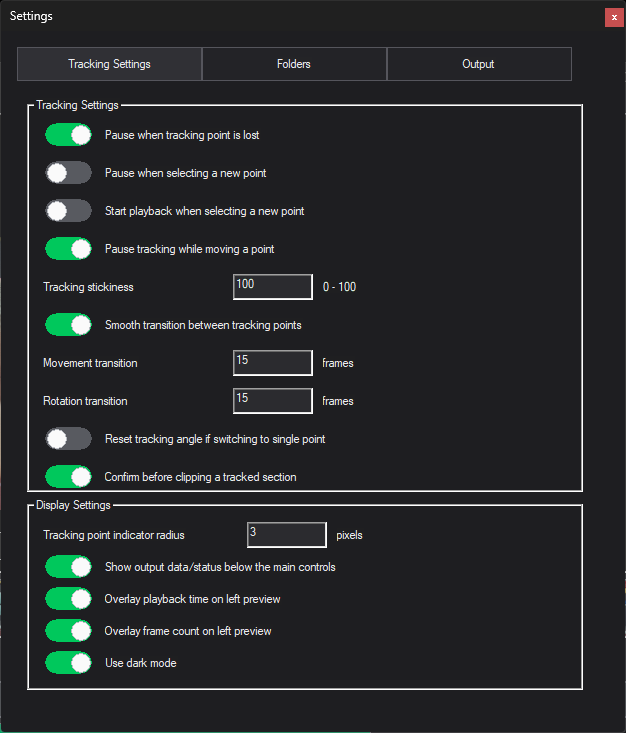
Actual MotionTracker Tracking Settings tab showing tracking and display options
Actual MotionTracker interface · Tracking Settings tab

Tracking behavior

ControlWhat it does
Pause when tracking point is lostPause tracking if the selected feature can no longer be followed reliably.
Pause when selecting a new pointPause playback when choosing a replacement tracking point.
Start playback when selecting a new pointResume playback automatically after a point is selected.
Pause tracking while moving a pointPrevent tracking from advancing while adjusting a tracking marker.
Tracking stickiness (0–100)Adjust how strongly the tracker stays attached to the selected visual feature. The screenshot shows 100.
Smooth transition between tracking pointsEase changes in tracking position and orientation rather than jumping immediately.
Movement transition (frames)Set the duration of positional transitions; the screenshot shows 15 frames.
Rotation transition (frames)Set the duration of angular transitions; the screenshot shows 15 frames.
Reset tracking angle if switching to single pointReset the two-point orientation when changing to single-point tracking.
Confirm before clipping a tracked sectionRequest confirmation before shortening or clipping tracking history.

Display settings

ControlWhat it does
Tracking point indicator radiusSet the visible marker radius in pixels; the screenshot shows 3 pixels.
Show output data/status below the main controlsDisplay additional output and status information beneath the main toolbar.
Overlay playback time on left previewShow the current and total playback time in the source preview.
Overlay frame count on left previewShow the current frame and total frame count in the source preview.
Use dark modeEnable the dark appearance shown in these screenshots.

Folders

Choose where MotionTracker writes exported results and saved frames. These are separate destinations.

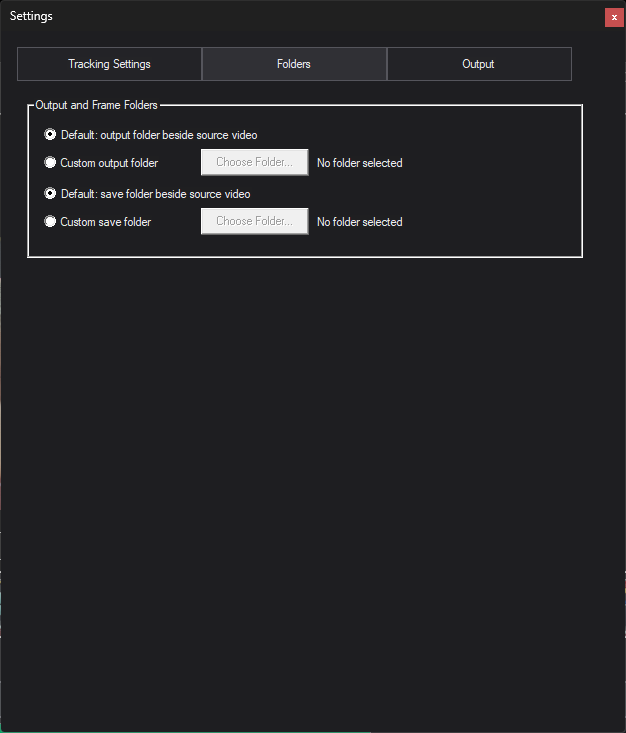
Actual MotionTracker Folders tab with default and custom output and frame-save folder options
Actual MotionTracker interface · Folders tab

Output and frame folders

ControlWhat it does
Default: output folder beside source videoPlace exported output beside the video you opened.
Custom output folderChoose a separate directory for exported results using Choose Folder.
Default: save folder beside source videoStore saved frames beside the source video.
Custom save folderChoose a separate directory for saved frames using Choose Folder.
Choose FolderBrowse for a destination; the button is available when the corresponding custom-folder option is selected.

Output

Configure video encoding, animation playback, and whether tracked frames or preview zoom are written to output.

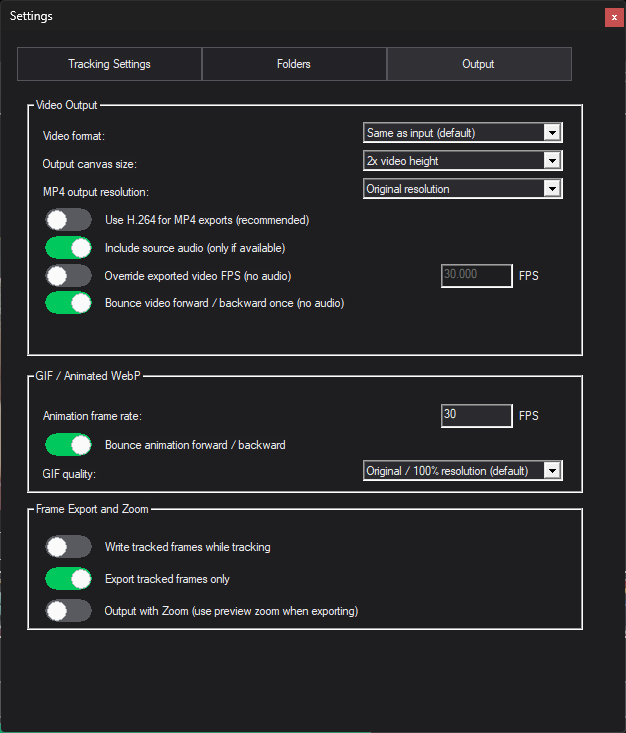
Actual MotionTracker Output tab with video, GIF, animated WebP, and frame export settings
Actual MotionTracker interface · Output tab

Video output

ControlWhat it does
Video formatChoose the export format; the screenshot shows Same as input.
Output canvas sizeChoose the output canvas dimensions; the screenshot shows 2× video height.
MP4 output resolutionSet the MP4 resolution; the screenshot shows Original resolution.
Use H.264 for MP4 exportsEnable H.264 encoding for MP4 output when supported.
Include source audio (only if available)Preserve audio from the source video where supported.
Override exported video FPS (no audio)Set a custom video export frame rate; audio is disabled when this override is used.
Bounce video forward / backward once (no audio)Export forward playback followed by reverse playback; audio is disabled.

GIF / Animated WebP

ControlWhat it does
Animation frame rateSet the animation FPS; the screenshot shows 30.
Bounce animation forward / backwardPlay the animation forward and then backward.
GIF qualityChoose the animation output quality or resolution; the screenshot shows Original / 100%.

Frame export and zoom

ControlWhat it does
Write tracked frames while trackingWrite processed tracked frames during tracking rather than only later.
Export tracked frames onlyRestrict frame output to frames belonging to tracked ranges.
Output with ZoomApply the preview zoom level to exported output when enabled.

Need more help?

Visit the TechVantage website for account and licensing information. Interface labels and available options may vary slightly by MotionTracker version.